AUTHOR: Anonymous
TITLE: Party Bracelet Tutorial #2 - Getting Started
DATE: 4:09:00 PM
-----
BODY:
First of all, I am assuming that you have at least some knowledge of beading, such as using crimp beads. If not, post a comment and I'll either find a link for basic beading or write something up.
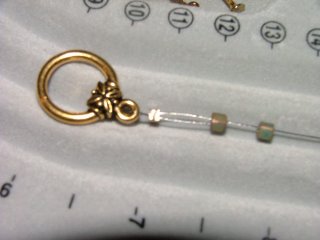
1. Attach one half of the toggle clasp with the metal beading wire and secure with a crimp bead.
2. Add enough "E" beads to encircle wrist.
 3. Attach the other half of the toggle clasp and secure with the other crimp bead. Keep in mind not to jam the E beads too close together, they need a little wiggle room (but don't leave big gaps either) so you can weave the nylon thread between each bead two or three times as you add each layer of beaded fringe.
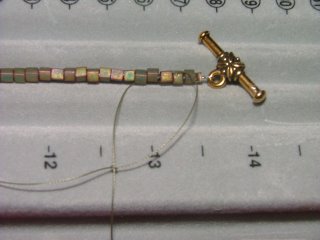
 4. To attach the nylon thread, make a slip knot and slip it between the first and second bead on one end of the bracelet and pull to close the knot around the wire. Leave the tail long enough to thread because once a couple of the beaded fringes have been made, I thread the tail and then weave it through one of the fringes and pull it out and snip it.
5. Now it's time to brew your bead mix. I poured the bead mix in and add a dash of each of the three complimentary seed bead colors and stir.
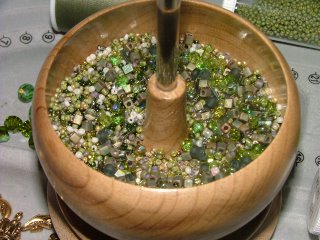
Note: I utilized my bead spinner so I wouldn't obsess about bead placement or pattern on each of the fringes. Random beadage is really all that is needed.
--------
 3. Attach the other half of the toggle clasp and secure with the other crimp bead. Keep in mind not to jam the E beads too close together, they need a little wiggle room (but don't leave big gaps either) so you can weave the nylon thread between each bead two or three times as you add each layer of beaded fringe.
 4. To attach the nylon thread, make a slip knot and slip it between the first and second bead on one end of the bracelet and pull to close the knot around the wire. Leave the tail long enough to thread because once a couple of the beaded fringes have been made, I thread the tail and then weave it through one of the fringes and pull it out and snip it.

